Happy Easter!

9 04 2012

During a recent crafty getaway with Sarah, I doodled on some easter eggs. One a day in fact. They were like my creative break from being creative. Does that make sense? They were easy, had no plan, and no required outcome. If they turned out nice – hurray! If not, I wasn’t really out any time, frustration or money. But I’m happy with the final result and since we were traveling the week prior to Easter, they were our sole decorations for the holiday.

These were inspired by some I found on pinterest that Alisa Burke had done. Hers are crisp white and black with finer details. Something came over me while I was packing for our trip and I thought of those eggs. So I tossed a few previously blown out eggshells into the oven to bake off any potentially harmful bacteria, stuck them in a container with a sharpie and into my suitcase they went. The question is, who did I think they were going to harm? It’s not like I was filling them with chocolate. I wanted to boil them but I didn’t have time for them to dry before leaving town, so baking had to do. I now think this was probably an unnecessary step. Unfortunately, it browned the shell a bit. Fortunately, the antiquey sheen given to them by the baking grew on me. More so when I placed them in a gun metal glazed Eva Zeisel relish dish.


Valentine Necklaces

14 02 2012

Did you wonder what we were making last week? Well, here they are – valentine necklaces!

I literally got requests from parents at Eleanor’s preschool to make beanbags again like last year, but chose to politely ignore them. They were a little more work than I was up for this year as I’m on jury duty and had no idea how much time I’d actually have.

Inspired by these gift tags over at burlap + blue, we made necklaces out of crayola model magic clay. They clay is fun and easy  to work with and created light as air pendants. The only down side is that they can pretty easily be broken in half if one should try.

Best idea for preschoolers? Probably not.  Certainly not as useful as the beanbags. However, they’re delicate and sweet and Eleanor is very happy with them. Plus it gave me an excuse to buy a lovely little sampler pack from The Twinery.


I’m also happy to announce that we finally used up all this pink card stock. This is literally the 3rd year that it has been used for making valentines.

Not only did she happily carry her bag of valentines to school this morning, but we got her all gussied up with her felt button covers, one of these necklaces AND my 1st ever attempt at ribbon braids in her hair. Not just any ribbon braids either, ribbon braids in a heart shape. I really need to stop looking at Girly Do’s By Jenn as I think I might be getting carried away. Little girl hair styling on a willing participant is a bit addictive.


A Bubbly Valentine

13 02 2012

Unlike his birthday themes that he picks out 2 years in advance, Seth was super indecisive about his valentines this year. He really wanted to give out little tubes of bubbles, but he kept changing his mind on how exactly these bubbles were going to be presented. Two days before Valentine’s Day and he’s describing to me his Plan A, Plan B, Plan C… When he got to Plan D I cut him off. He really wanted to do something similar to last year. But we made one up and it just wasn’t working due to the thickness of the tubes. The rest of his plans were similarly complex with unresolved issues and we were getting down to the wire. So I started to do a little brainstorming and came up with this tag. It actually contains elements from many of his ideas – photo of him, bubbles, a tag. The only plan it didn’t accommodate was one involving little rockets with the bubbles tucked inside. I’m not THAT crazy. Well… maybe I am, but we didn’t have enough time for crazy.

I took a photo already out on flickr, popped it into Speechable to add the silly little speech bubble, used the handy tools for sizing and printing already on iphoto and boom I had a pic ready to make into tags. Super speedy I tell ya. Using my great new circle punch (that had some how found it’s way into my christmas stocking not too long ago), Seth was able to punch them all out himself. It really helped that the punch is flat on both sides and fairly wide, so even though he’s only 7 he had enough strength to work this large punch upside down. He added his signature to the backside, including circles representing hugs but left off the ‘x’s so as not to give any wrong ideas.


Valentine Making in Progress!

10 02 2012

Now the hard part. Waiting 2 days for them to dry. Tick. Tock. Tick. Tock.


Felt Heart Button Covers in Action!

9 02 2012

Of course the very day after Eleanor insisted that she could not possibly wear the button covers with anything other than her purple stripped tights, I found her rummaging through her drawers looking for her “heart buttons”! Apparently it finally sunk in that I don’t do the wash daily and she had settled on a different pair of tights. And here I was thinking I had found the solution by putting the shirt aside to wait for the tights to be cleaned. Nope. Once we put all the clothes back in her drawers, dressing commenced and I ended up with a very happy girl.

I did find out that it doesn’t pay to ignore the directions on which way to place the button slit and that said slits should be made on the small side. As I mentioned yesterday, it took me less than 5 minutes to make the 7 little hearts. Well, it took me even less than that to redo the 3 front hearts so that they wouldn’t pop off every time her little belly rubbed against something. Now they’re on there snugly and all is going well. Personally, it’s the french cuffs on a 4 yr old that slays me.

PS Look where my paper doll snowflakes ended up! A dreamy little slide show about snow. Oh, how I wish it would snow!


Felt Heart Button Covers

8 02 2012

I’ve always wanted to make these little felt button covers since I very 1st saw them in a Martha Stewart Kids years ago when the magazine still existed. But since we live off hand-me-downs, this is the 1st year I’ve actually had a button down shirt for Eleanor that would work. I think it looks better on a wider placket such as that in the original inspiration, but this works just fine too. Once I had the felt, the project took less than 5 minutes. I was shocked that I had such a cute little embellishment in such a short amount of time. It helped that I let go of the idea of perfectly measured hearts and just eyeballed it.

Eleanor thinks they’re grand too, but insists on wearing them with a certain pair of purple striped hand-me-down tights that she wore the day before I made these and I’ve yet to wash. Maybe that’s what I should go do now!


Valentine Matching Clip Job

2 02 2012

Inspired by a photograph found via pinterest, I decided to make a valentine themed job for Eleanor’s preschool classroom. When I showed it to Eleanor she loved the idea. Well, except for the sharing part. Apparently there was a bit of a concern about a specific little boy ruining it with his “germs”.

I promised to laminate it and told her if she liked it, I could make a 2nd set for home and she graciously gave her consent. Seeing as she couldn’t keep her hands off it last night when it wasn’t even done yet, I have a feeling I’ll be making that 2nd set.

I backed 14 pretty papers with pink card stock, laminated and cut out hearts.

I was having difficulty with glue and the clothespins as I was trying to use the left over laminated scraps. However, not a single type of glue in my household would hold those puppies together. I finally took a step back and simplified. Using a little more fresh unlaminated paper and good old modge podge I got the job done.

The arrow points are still laminated as I feared a gaggle of preschoolers would otherwise do them in. Plus both clips and hearts are backed in solid pink.

Eleanor was rather upset that she couldn’t bring it to school this morning, but now it’s ready and waiting for her.


Thanksgiving Place Cards

22 11 2011

After plenty of suggestions, the kids finally chose the place cards they wanted to make for Thanksgiving. Origami is simply irresistible to Seth. We didn’t use construction paper like the instructions suggest, but nifty origami paper that reminded me of wooden boards.

We now have an entire fleet, ready and waiting for Thanksgiving.

Here are some of the other options we considered:


Scavenger Hunt

23 06 2011

We’re very into scavenger hunts around here. In the car, the house or the yard. With picture clues or words. Lists of items to find, clues that take you from room to room or simply a hide and seek affair. The kids just can’t seem to get enough of them. So when thinking of what games the kids might enjoy at Eleanor’s birthday party, it didn’t take me long to land on a scavenger hunt. And since both of the crafts and all of the decorations were flower related, it was time to do something with butterflies.

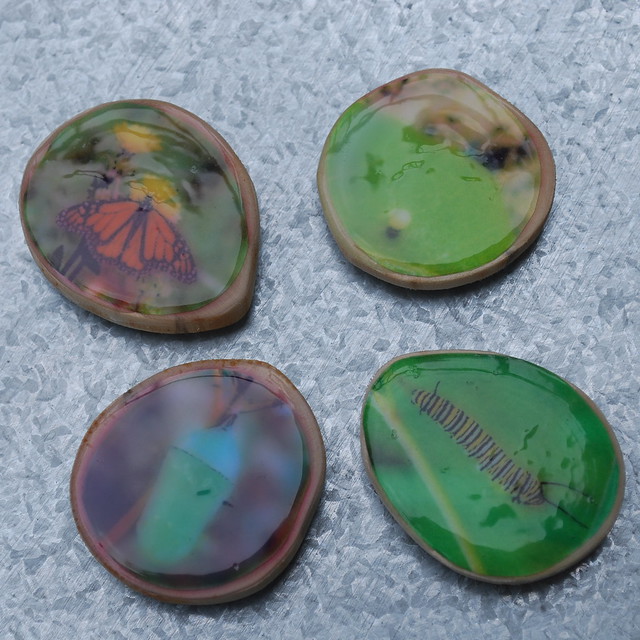
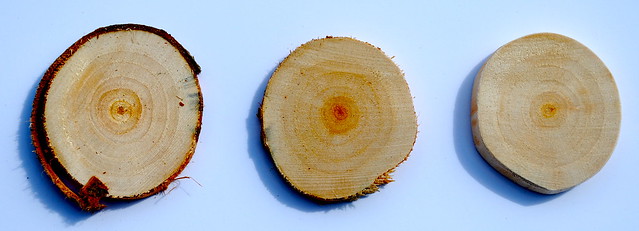
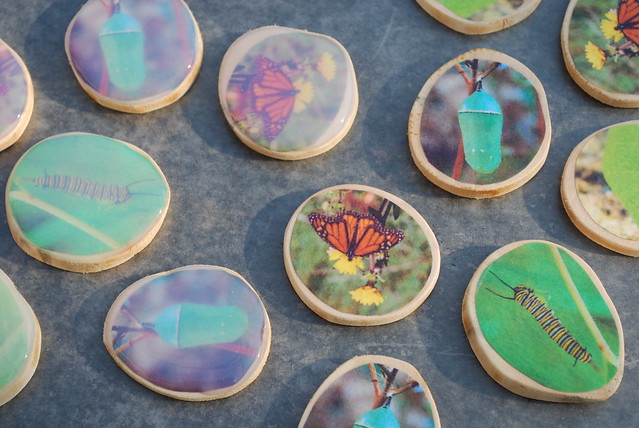
I made these magnets using wood circles, photos, modge podge, dimensional glaze, super glue and, of course, magnets. The wood circles were cut from branches in our backyard. Each one sanded down smooth while I dreamed of a hundred other projects I could use them for.

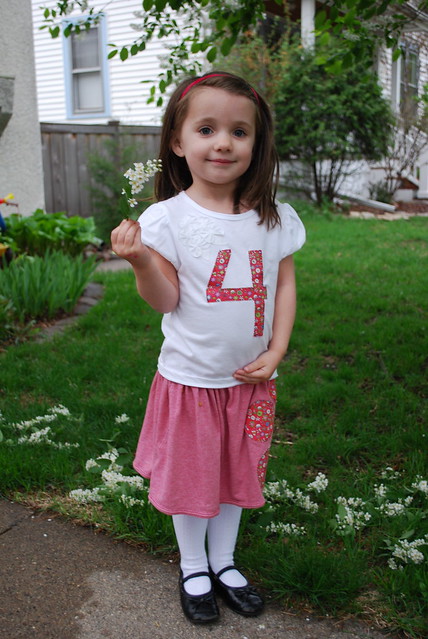
I even got a little help. This is her best “why are you taking a picture of me” face while wearing a nightgown over her other jammies and a matching headband to boot.

Although I have plenty of my own pics of various butterfly stages, I decided to go with the classic monarch. And since I only had a shot of the caterpillar stage, I went looking on flickr for the rest. I was fortunate to find images which allow for personal use. The egg shot is from kiwinz and the butterfly is from grandma sandy+chuck. I’d tell you the chrysalis shot only I lost the link. Sorry chrysalis photographer! But I can say that I really appreciate their willingness to share and plan to look at creative commons licenses for some of my photos.

I printed the pics on plain paper and affixed them to the discs with modge podge. After they dried I added a layer of dimensional glaze. Awesome stuff, I tell ya. It adds a nice think resin like coating. The right side of this pic is before adding the glaze, the left after. It goes on sort of milky but dries clear after a day or two as you can sort of see in the top photo. Hard to take a pic of, but I think you get the idea. The last piece of the pie was to glue the magnets on the backs. I used your regular ol’ black circle magnets but would really love to research stronger magnets for future projects. I think the patience needed for this projects was the hardest part. All that waiting for things to dry drove me nuts. I so wanted to touch them. And well, I did. Once. Had to re-do that one.

I made a complete set of 4 for each child attending the party. Fortunately, the rain eased up so we could do the scavenger hunt outside. We bundled everyone up, headed to the backyard and had a brief discussion on the 4 stages of a butterflies life cycle. Most of the kids were 3 or 4 years old after all. They were jumping up and down to tell me the answers. We then sent them into the yard to find one of each magnet. Once they found their 4, I sent them back to help their friends.

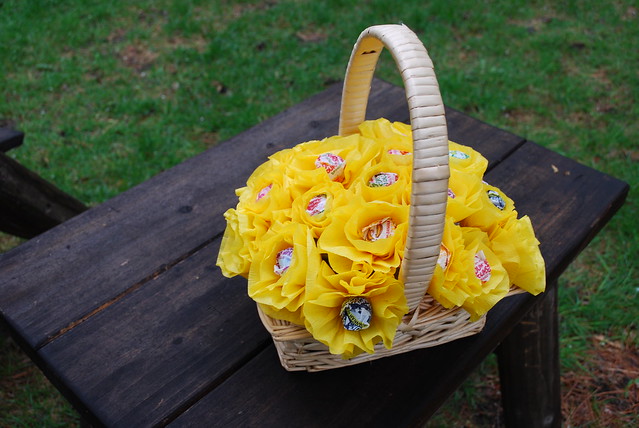
The magnets were theirs to keep but I felt a reward for finding all 4 was still needed. And what did they get? A flower lollipop of course!

And could I stop at just one flower per kid? Oh, no. Not me. I had to make a whole basket full.

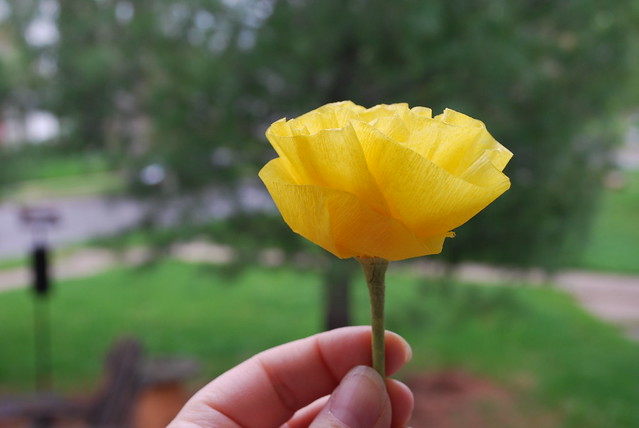
Super easy to make while watching tv after the kids go to bed, but not so easy to make when they’re around. “I want root beer flavor” “I want cotton candy!” “Will you write my name on this one?” Ugh – go away.

I used left over crepe paper streamers from a past birthday party, winding around the sucker while occasionally folding in a bit at the bottom. Then I secured them with some floral tape, which I continued all the way down the stem. It took a couple practice goes, but I eventually got the knack of it.

After each child picked out theirs (and immediately tore off the crepe paper) I divvied out most of the rest into the thank you bags.

I really had fun creating the magnets and lollipop flowers and the kids really seemed to enjoy it all too. This was the one project I did more than a day in advance. And good thing too, with all that drying time!


Birthday Outfit

16 06 2011

Call me crazy. It’s ok, I can take it. Really I can. It’s because I know it to be true.

I literally made this outfit the morning before Eleanor’s birthday party. I know! I can hardly believe it myself.

The t-shirt was purchased a few weeks beforehand with a birthday shirt in mind, but as usual I didn’t get around to it. I had pretty much given up the idea when I found myself ahead of schedule on the day of the party. Well, not really ahead of schedule, but all required projects were completed and I had moved on to the wish list of other projects I wanted to do but weren’t really necessary.

If my parents hadn’t been there helping out I know for certain it wouldn’t have happened. But as it was, my mom had just finished up the garland and I was feeling a little jealous that she got to sew something. So using some of the left over fabric and some fusible interfacing I had on hand, I set to work. Steve helped out by drawing the 4 and the circles. The shapes were simply sewn on with a zigzag stitch. The quality isn’t that of an heirloom but it will certainly work for the summer and has lasted through several washings already.

As for the skirt, I made it from an old t-shirt and some even older 3/4″ elastic. I cut the bottom of the t-shirt off to the length of the skirt plus an inch. Then I used spray starch to help stabilize and ironed a fold to make the casing. I’m proud to say I remembered to sew on the applique circles prior to adding the elastic. However, please don’t magnify the pictures or you’ll see all my wonky stitching. It’s my 1st applique after all.

I can assure you I breathed a sigh of relief when Eleanor decided she was willing to wear it. Often it takes her weeks to warm up to the items I make her, but it was only minutes this time. Phew. She added knee highs to the outfit and was quite pleased that there were 4 circles to match her age.